Solder & Cold Soldering: Cold Solder Joints in Electronics
Table of Contents
ToggleIntroduction
The cold solder joint is the single most common cause of doom in electronics, be it hobbyist or industrial-scale. Cold solder joints can be blamed for a high percentage of electronic PCB design failures in today’s world, and it’s not too much to say they are the leading cause. Identifying What Causes Cold Solder Joints, What They Can Cause, and How to Repair a Cold Solder Joint are all important aspects of the soldering process that every engineer, technician or hobbyist should be aware of.
In this guide, you will learn how to spot cold solder joints, tell the difference between good and bad solder joints, become an expert at diagnosing cold solder, and use practical techniques that can lead to a dramatic reduction in cold solder joints in your projects. From learning what is too little heat while soldering, to the true facts about proper soldering techniques, and the importance of using good solder in this article you will find a wealth of information to make sure you have strong solder joints in all of your electronics.
What Is a Cold Solder Joint?
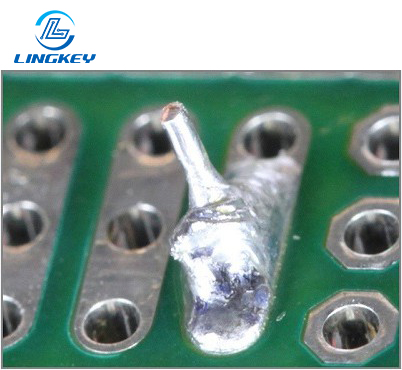
A cold solder joint (or, more strictly, cold solder junction) is a poor, unreliable solder connection between a lead of a component and the pad of the PCB. Also referred to as “cold soldering,” these joints can often be dull and grainy—quite different from a healthy, shiny finish. Cold solder joints are a very common bad solder joint, and occur when the solder has not been heated to the proper temperature for a good bond or moved while cooling.
It should be noted that cold joints are often caused by insufficient heat from the soldering iron tip or bad soldering habits. Also common is dirty or oxidized surfaces that inhibit the solder from sticking properly, this weakens the final joint.
Why Do Cold Solder Joints Matter?
Soldered connections are the workhorse of electronics. If a single joint is flawed, the results can be disastrous – ranging from minor signal fluctuations to complete circuit failure. Poor solder joints pose a risk to device performance and return rates and are one of the biggest causes of component failure and rework in modern electronics manufacturing.
Poor solder connections can result in intermittent connectivity, poor resistance to vibration or thermal cycling and shortened the life of the assembled PCB. Because many cold joints are hidden or do not fail until stressed, you need to be alert for signs of cold soldering during visual inspections and testing after assembly. Prevention and good soldering are the only way to guarantee a reliable solder joint.
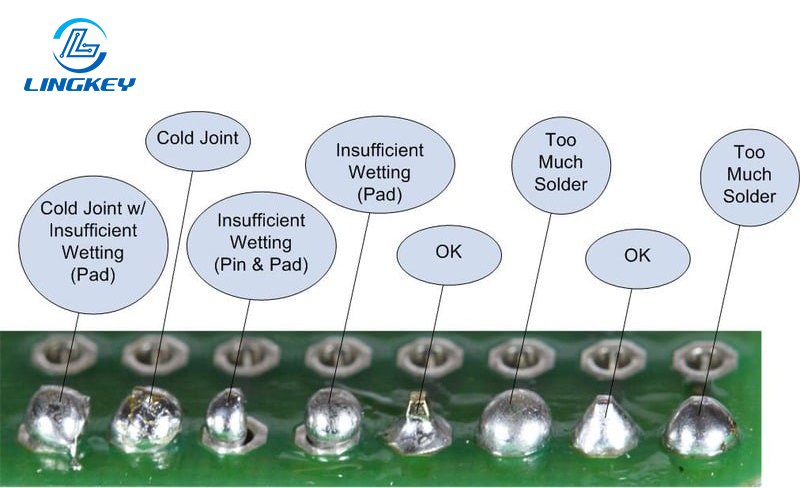
How a “Good” Solder Joint Looks and Behaves
A good solder joint is both a good electrical connection and a good mechanical connection. Solid solder joints possess the following distinctive characteristics:
- Shiny, smooth surface texture—a joint should be smooth, with concave fillets.
- Full coverage:Solder flows up both the component lead and the PCB pad, indicating correct soldering and wetting.
- Firm adhesion:No movement when gently probed.
- Consistent shape:No excess or missing solder; no visible cavities.
Common Causes & Root Failures of Cold Solder Joints
Knowing the common causes of cold joints gives you the power to fix them on the spot for both initial assembly and rework. Here are the top cold solder root cause and related process issues:
- Insufficient Heat:Use a soldering tip that can reach and maintain the correct temperature. Solder does not flow or wet the metal sufficiently resulting in a poor joint.
- Dirty or Oxidized Surfaces:Oxidation or contamination on the lead and PCB pad inhibits solder wetting and thus solder flow.
- Movement While Cooling:If a part moves while the solder is still cooling, the joint is more likely to be weakened or cracked.
- Wrong Materials or Bad Technique:Using inappropriate solder, past its expiration date, low quality flux, or bad workmanship may cause cold solder joints.
- Lead-Free Solder Issues:These alloys necessitate a higher temperature for soldering, and not attaining these temperatures can result in cold soldering. Lead-free solder can be more difficult for beginners to work with.
- Large or Heat-Absorbing Components:Larger components drain heat away from the area being soldered, so the joints are more likely to cool too quickly and form improperly.
- Poor Soldering Equipment:Defective temperature regulation or outdated soldering tool could prevent to get the right thermal profile.
- Operator Error:Haste, fatigue and oge angle/technique are the common causes and consequences of the above.
Causes and Effects of Cold Solder Joints
Cause | Effect |
Insufficient heat during soldering | Solder fails to wet leads/pad, weak joints |
Dirty/oxidized surfaces | No adhesion of the solder, failed joints |
Movement as solder cools | Cracked or intermittent connection |
Poor type of solder or expired solder | Incomplete bonds, lower joint quality |
Uncalibrated soldering equipment | Unpredictable joint reliability |
Environmental contamination | Causes of bad solder joints with dull/cracked appearance |
Forms & Types of Cold Solder Joints
Cold solder joints show up in different ways, and knowing what forms they take aids in prevention and diagnosis:
- Surface Dullness:Joints usually look grainy, matte, or lack shine.
- Cracked Solder:Lines visible around the joint, signifying movement as solder cooled.
- Incomplete Wetting:Soldering area has gaps, splits, or visible separation between solder and pad/lead.
- Distributed vs. Isolated:More cold solder joints are indicative of poor process control while single fault is resulted from local cause.
- Hidden Joints:Particularly for BGA or SMT devices, where you can’t simply see cold solder joints.
How a Cold Solder Joint Forms (The Principle)
A good solder joint is nothing more than good heat, clean metal surfaces, and good flux action. If the heat during soldering is not sufficient or if the surfaces that are heated are dirty or oxidized, neither adhesion nor wetting can take place. Thus, solder can solidify with internal cracks, poor bonding, and even voids, making it vulnerable to vibration or future temperature changes.
Consequences and Risks of Cold Solder Joints
The risks of cold solder joints are numerous. Here’s what can go wrong:
- Intermittent Connections:Circuit may work, then suddenly fail.
- High Resistance:The trace from the component lead to the PCB pad may be resistive, dissipating
- Complete Circuit Failure:Weak solder joints can make devices stop working unexpectedly.
- Mechanical Weakness:Even low-impact vibration can break a weak soldered connection.
- Long-Term Degradation:Heat cycles and vibration aggravate latent failures in weak joints.
- Higher Repair and Warranty Costs:Locating and fixing a cold solder joint can be more expensive post-assembly.
- Safety Concerns:Faults in safety-critical or high-power circuits can pose major hazards.
How to Detect & Test for Cold Solder Joints
Identifying cold solder joints can be approached through several methods:
Visual Inspection: Look for a matte or granular finish, cracks and delamination. A good solder joint should be smooth and well bonded, cold solder joints are usually dull and uneven in appearance. Provide adequate lighting and magnification.
Continuity Test with a Multimeter: Measure resistance through the joint. A good solder joint should have close to zero ohms of resistance. High, varying, or open continuity indicates a potential cold solder joint.
Advanced Methods(Diagnosing Cold Solder): To properly identify cold solder, begin by inspecting all the suspect joints on the entire PCB. Look closely at the whole board, especially in areas containing large components, and in particular those exposed to vibration or temperature extremes, as these are also common areas for cold joints.

Quick Checklist to Identify Cold Solder Joints
- The solder joint appears dull, rough, or lumpy instead of shiny and smooth.
- Solder has not flowed evenly around the joint.
- Gaps or cracks are visible between the component lead and the PCB pad.
- Intermittent functionality is noticed when gently moving the board.
- Resistance is higher than expected when checking the solder joint with a multimeter.
Repairing Cold Solder Joints: A Step-By-Step Guide
Reliable solder joint can be assured only by giving due attention in every stage of the process of repair.
Tools and Materials
- Thermostatically controlled soldering iron
- Correct type of solder (leaded or lead-free as required)
- Flux to promote solder flow and adhesion
- Solder wick for solder removal
- High-quality cleaning supplies (isopropyl alcohol, lint-free wipes)
- Magnification tools for inspection
- ESD-safe workstation
How to Fix a Cold Solder Joint
- Identify the Defective Joint:Use the above technique to locate the poor solder joint.
- Secure the Board and Component:Motion in repair may cause the cold solder joint to break again.
- Remove Old Solder:Place the tip of the soldering iron and with the solder wick soak up the bad solder. Clean the work area.
- Clean Surfaces:Make sure that the component lead and the PCB pad are clean of oxide, dirt, or extra flux.
- Apply Flux:Flux improves wetting and adhesion of the solder, preventing future bad solder joints.
- Correct Soldering Procedure:
- Use good quality solder and make sure your iron is the right temperature. Apply heat to the lead and pad at the same time.
- Apply fresh solder wire until it spreads evenly about the joint and creates a shiny, concave fillet. Avoid overheating, which may cause damage to the PCB layout or component leads.
- Allow to Cool Naturally:Do not move the components until the solder has cooled to maintain joint integrity.
- Inspect and Test:Check visually for a smooth, well formed joint. Perform continuity check to ensure good electrical connection.
Best Practices & Prevention: How to Avoid Cold Solder Joints
Avoiding cold solder joints is much better than fixing them. The following practical advice will enable you to produce dependable solder joints in every soldering operation:
- Always Use High-Quality Solder and Flux:The old or oxidized solder could be less Select the appropriate solder alloy for the application.
- Cleanliness is Critical:Stain the soldering places, eliminate oxidation or grease and get good contact among the lead and the PCB pad.
- Maintain the Right Soldering Temperature:Set your soldering iron to the temperature recommended by the manufacturer for the type of solder that you are using. Not heating enough when soldering is the most common cause of cold solder joints.
- Use the Correct Soldering Technique:Heat both surfaces uniformly before applying the solder. Don’t shift the component as the solder cools.
- Stabilize Your Work:Use clamps, vises, or PCB holders to keep the joint from moving during operation.
- Inspect Each Joint Carefully:Routine inspection is essential for dependable solder joints. Visually check each joint and test electrically.
- Update and Maintain Soldering Equipment:Be sure to replace tips that are worn out and calibrate your iron regularly to prevent temperature drift.
Preventing Common Causes of Cold Solder Joints
Problem | Prevention Strategy |
Insufficient heat | Choose and calibrate soldering iron, check temp |
Dirty/oxidized surfaces | Clean leads and PCB pads thoroughly |
Cheap/expired solder | Always use high-quality solder and proper storage |
Bad technique | Train for correct soldering methods |
Movement as solder cools | Secure components before and after soldering |
Environmental issues | Work in a controlled, clean, low-humidity space |
Industry Variations and Special Considerations
- Lead-Free Solder: Cold soldering could be more prevalent due to higher points of melting. Set the temperature of the soldering iron accordingly.
- BGA, CSP, SMT Components: The concealed cold solder joints beneath these devices can only be detected with special equipment (X-ray, AOI).
- Vibration and Heat Cycles: Especially in industry and automobiles, the demands are high. Solder joints need to be strong enough to survive thermal cycling and mechanical stress.
Comparison: Cold Solder Joints vs. Other Solder Defects
Defect Type | Appearance | Electrical Effect | Risk Factor | Prevention Tool |
Cold Solder | Dull, grainy | High resistance, open | Most common cause of electronics failure | Iron temp, technique |
Dry Joint | Incomplete bond | Weak/No connection | Can lead to total component failure | Enough solder, proper flow |
Voids/Blowholes | Bubbles, holes | Unreliable | May weaken joint over time | Skill, temperature |
Bridging | Solder between pins | Shorts | Can short-circuit PCB zones | Careful soldering |
Frequently Asked Questions (FAQ)
How do I identify a cold solder joint quickly?
What is the most common cause of cold solder joints?
What happens if I use the wrong type of solder?
Can cold solder joints make a device fail randomly?
How do I fix a cold solder joint?
Conclusion and Actionable Recommendations
Cold solder joints are among the most common reasons for failure in electronics, resulting in fluctuating or intermittent electrical connectivity and compromised mechanical strength. Degenerate solder joints frequently go undetected until they lead to part failure or system downtime. However, these can be minimized by using the correct soldering process, temperature, good quality solder, and visually examining every solder joint.
Action Points:
- Prioritize cleaning and preparation for each soldering area.
- Use the correct soldering temperature and type of solder for your application.
- Inspect every joint visually and electrically.
- Regularly update your soldering equipment for peak precision.
If you practice these things, you will have good solder joints and sturdy PCBs in every project.
")
")


")
")
")